
cloisonne
I hope you enjoy using these techniques in your work.
Please respect my copyright on this tutorial and my artwork. Jane Cather 2008
All the enameling is done with a torch. The set up is of 2 bricks stood on end at an angle to each other with wire mesh set on the ends and a small trivet set on this. I relied heavily on my print outs from Carol’s class and the ‘Art of Enameling’ by L. Darty.
I began with using 24g black annealed wire in place of cloisonné wire (also 22g annealed wire, copper and brass works - it just depends on the design and the scale) I made an oversized simple line drawing which I scanned into the computer to make it the size I wanted. This was printed out and laid flat on the table. The wire was bent around this image with pliers. I filed the ends and tried to make enough tension to keep the ends together but did not solder them. The wire image was shaped a bit on the back side of the copper base that had been formed slightly. When laying the wire shape on the top it does not matter if it does not lay perfectly and follow the curve of the base as it will ‘slump’ into the shape. (Gloria really helped me improve the forming of my ‘foundation’ piece.)
On most of my experiments I did not counter enamel and so got some warping and cracking. But for ‘finished’ pieces I used 20g copper with 3 layers of counter enamel and in the case of my necklace the bale was soldered on first.
So now I have the copper back, formed a little, copper bails soldered on with hard solder and 3 layers of counter enamel.
In the first method I enameled one coat of hard flux on the front. Then the wire shape was positioned on the base and held using a bit of clear fyre and water. (A worry I read about here was if you covered the front with C.F. in this type of situation and it did not burn out completely there could be gas problems when subsequent layers of enamel were put over this?) The first coat of enamel is then reheated with the wire shape just laying on the top. When you see the molten stage the wire shape is pushed down into the enamel with tweezers where it may be sticking up and not following the shape of the curve. But it sinks down into the enamel primarily on its own. (be careful pushing down as the whole thing can easily flip off the trivet – I did this several times...)
If the wire has been sunk into one layer of enamel there will still be some depth of the ‘cell’ to fill with more layers of enamel. These next layers were wet packed onto the piece and fired. The edges of the piece were not cleaned and there is some scale jumping and there will be sometimes some scale from the steel wire also. For me this is patina. Of course, the first layer can be a color also. I did some I like with white. It seems at least 2 layers on a base that is at least slightly formed are needed to hold the wire if did not want to ‘fill’ the cells and leave it as is. I liked the rounded black wire seemingly lying ‘above ‘ the glass. You could probably get away with one layer if the the wire was hair thin?
I tried extending the wires beyond the surface but if they were pressured they easily cracked out of the enamel. I did not try to see if this was fixed by having the wire in a lot more glass. I wanted to hang something on the wire....also I wanted to have some of the wire sticking up off the back with dimension but just to anchor it in the glass seemed a little weak.
The second way is to build up the design on your piece in several layers of enamel and sink the wire form in last. There is usually little room then left in the ‘cell’. But because the wire is round it always remains a bit above the surface.
The black wire can be cleaned with a ‘scrubber’ in the flex shaft so it is ‘silver’. This round wire can also be filed flat for a different flat silver outline creating a surface where the enamel is flush with the wire if filed down enough.
Here are the examples:
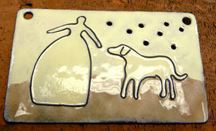
This is the line art for the dog. 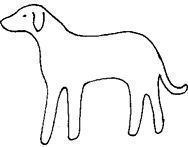
Enamel pieces -
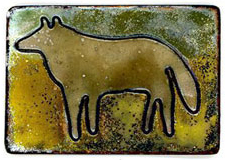 wolf 1 7/8 x 1 1/4
 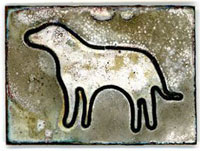 dog 1 1/2x1 1/8
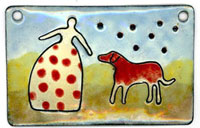
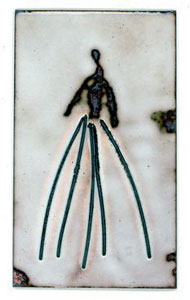
 “Inspired” 3 1/4 x 2
The black ‘dots’ are actually holes. The large holes are for the necklace cord, but as they seemed distracting I moved on to soldering a bail onto the back of future pieces. Shown at left is an early step for ‘inspired” ...the wires have been sunk into one layer of off white.
The woman and the dog have been packed with off white again and the ground packed with mars brown and fired. I liked just the black line in the cream.
 1 3/8 x 2 1/4
 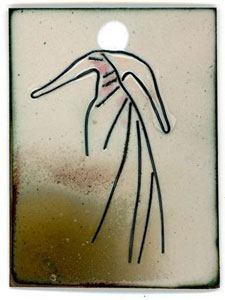 2 x 2 1/2
Both of these pieces are without counter enamel and did warp and crack even though they just have one coat of enamel. The first is sgraffito with loose wires just laid on and the other has one formed section combined with loose wires.
 2 1/4 x 2
 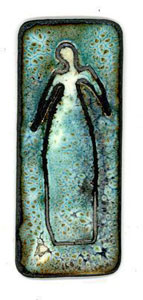 3/4 x 2
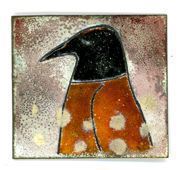
The crow is 4 individual wires sunk into one layer and then wet packed with additional layers. The woman has her head area and the bottom half of her skirt wire filed flat. It looks grey here , but very silvery on the actual piece. This piece was also wet packed with 2 additional layers.
I really like the look of this black line in the enamel. And, of course, abstracts and geometrics great also or a combination there of. This wire is not expensive and available in most hardware stores. For me this wire seems to have a lot of possibilities ( it is so very easy to shape!)and used with other techniques and materials it seems a lot of new forms could be created.
I hope you enjoy using these techniques in your work.
Please respect my copyright on this tutorial and my artwork. Jane Cather 2008